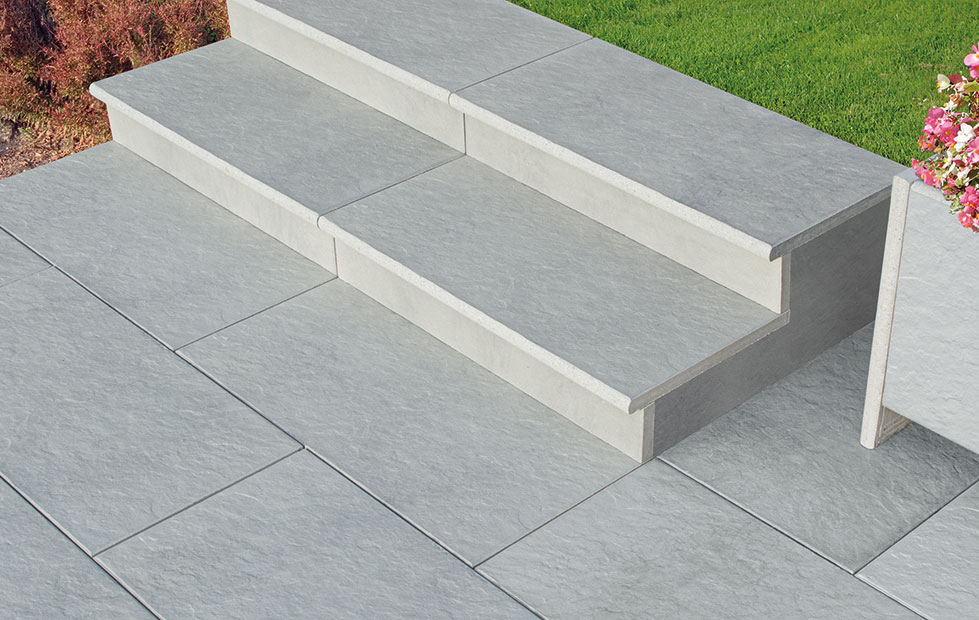
Paving strips are made from pavers with a sand-blasted and finely sand-blasted (embossed paver) surface and are suitable for both exteriors and interiors.
| PRODUCT | SIZE (mm) | PCS/M2 | PACKAGING | PACKAGE WEIGHT | WEIGHT PER M2 | ABSORBABILITY |
|---|---|---|---|---|---|---|
| TREND paving strips | 360 x 70 x 10 | 36 | 20 pcs | 11,8 kg | 21 kg | max. 3 % |
Basic characteristics
Trend paving strips are made of natural materials, such as high-quality roughly graded crushed natural stone material complemented by high-strength cements, color-stable pigments and construction chemicals guaranteeing their low porousness. Production is carried out using the modern technology of hermetic pressing, which makes the product very strong, abrasion-resistance and frost-resistance. An indisputable advantage of the Trend paver strips is their industrial impregnation treatment for a decreased water absorption of the surface and easier cleaning.
Technical data for adhesion
Before actually applying the tiling tape, it is good idea to first measure and plan everything. At the same time, it’s always necessary to follow the manufacturers instructions regarding the individual products that you’ll use during the application.
1. PREPARING THE SURFACE
Trend tiling tapes can be stuck directly to plaster, walls or ETICS thermal insulation systems.
Surface preparation for adhesion to plaster: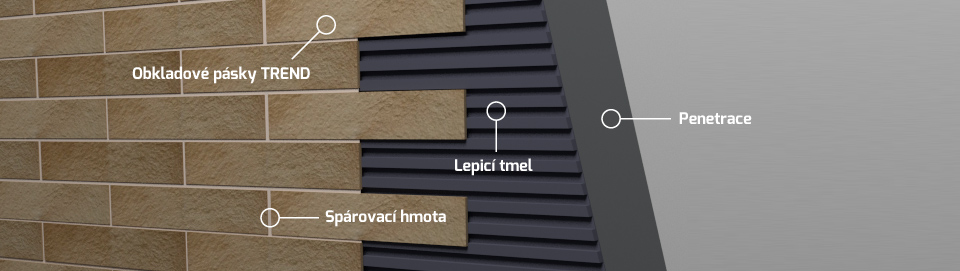
For proper application, the substrate must meet the following conditions:
- The substrate must be sufficiently mature and clean, i.e. without dust, grease and other impurities. It is also assumed that it won’t contain efflorescence, peeling areas of active crack, etc.
- There must be no places on the plaster with constant, significantly higher humidity.
- The substrate should be level and with sufficient load-bearing capacity.
- Any unevenness can be compensated with a lime-cement trowel.
In general, we recommend applying a bonding coating before applying the adhesive sealant in order to reduce its absorbency and slower drying, but it is always necessary to follow the manufacturer’s instructions, or the opinion of an expert who will assess your specific case.
Surface preparation for adhesion to ETICS thermal insulation systems
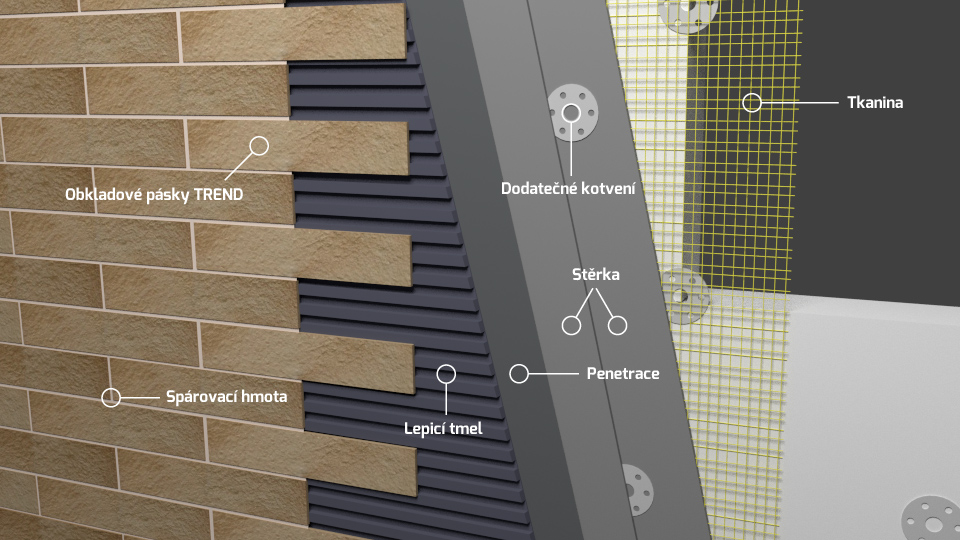
The basis of a successful application for ETICS thermal insulation systems is its correct installation in accordance with applicable standards, instructions from their manufacturers and expert opinions.
If you’re only tiling areas with a small number of rows (e.g. the plinth of the house, around windows, doors) additional anchoring isn’t necessary.
If you decide to line larger areas or even the entire house, then we recommend that you additionally anchor the thermal insulation system over the fabric before sticking the tapes.
After full-area anchoring, the surface is repainted. This covers the anchors and removes the slight unevenness. In the event that you subsequently remove significant regrinding irregularities, bear in mind that the ingress of dust must be removed with a suitable whisk, brush or compressed air. Gravel surfaces must be allowed to mature sufficiently for the minimum time specified by their manufacturers.
Before applying, we recommend that a bonding coat is applied to the prepared surface in this way in order to reduce absorbency and allow the adhesive to dry slower, but even in this case the respective sealant manufacturer’s instruction are decisive.
2. ADHESIVE PREPARATION, ADHESIVE APPLICATION AND TILING
Before actually applying, we recommend that in advance, you give a little thought with regard to the progress of the work and follow the principles that adhesion should start in the corners, at windows, doors, etc. If you’re planning a more demanding adhesion method, including a special solution for tiling around windows, doors, tiling larger areas or the entire house, adhesion should precede the processing of the laying plan.
We recommend using a high-quality cement glue for adhesion, which will meet higher demands for frost resistance and elasticity, especially in relation to outdoor application. Mix the adhesive sealant according to the instructions on the adhesive package. We only mix the amount that we are able to apply before the setting occurs.
It’s only possible to start applying the adhesive after the bonding coat has dried. The adhesive is applied with a stainless steel notched trowel with a tooth height of 8 mm over the entire surface. The adhesive is applied to an area that can be covered with tape within 20 minutes. If the adhesive is not covered on the surface for a long period, it must be scraped into a bucket, mixed and reapplied.
Before tiling, always open several boxes of tiles and always take individual tiles gradually from each box.
We stick the tapes very gently and don’t press or hit the tile with a rubber mallet, we set the tile in the glue with uniform pressure and a sideways movement.
Glue the tiles with a joint of approx. 10 mm, you can delimit the width of the joint, for example, using using appropriately sized delimiting crosses. Mark and check the correct tiling direction with a spirit level.
When gluing corners, you can choose between alternating the offset of one tape across the width of the adjacent tape or by cutting two tapes at an angle of 45 degrees. Shortening and trimming of tapes is possible with the help of a table cutting saw or with the help of a manual cutting machine called flexy. In both cases, the use of a diamond wheels for concrete and stone is best.
3. GROUTING WITH GROUTING MATERIAL
Grouting is only carried out after the adhesive has hardened. Again, we recommend following the manufacturer’s instructions. For grouting, use frost-resistant, flexible grout designed for a joint size of 10 mm. The grout is mixed according to the instructions on the packaging.
Before grouting, it’s necessary to moisten the entire surface of the tiling. Grouting is performed using a grouting spatula directly into the joint. In the case of high-quality jointing compounds, where the manufacturer declares easy subsequent cleaning, it’s possible to perform jointing all over. Again, we recommend following the procedure recommended by the manufacturer.
After slight setting, the surface of the tapes are cleaned with a damp soft foam trowel, which must be constantly cleaned in water. Cleaning is done several times, the final clean is simply with clean water.
4. NOTICE
The temperature of the air, the materials themselves as well as the substrate itself shouldn’t fall below 5 °C during the work or during the 7-day period after application, air temperature shouldn’t fall below the freezing point. We also don’t recommend applying in direct sunlight on hot days, strong winds and rain. We recommend that you protect the surface from rain immediately after finishing the work, so that fresh glue and grout are not washed out and tapes are subsequently soiled.
All recommendations and procedures are based on our practical experience. For construction work with specific requirements, we recommend consulting experts on how to use it.
Trend tiling tapes meet the following standards:
ČSN EN 14617-1 – Artificial stone – Test methods – Part 1: Determining bulk density and absorbency
ČSN EN 14617-2 –Artificial stone – Test methods – Part 2: Determining flexural strength
ČSN 73 1326 – Determining the resistance of the cement concrete surface to the action of water and chemical de-icing agents
ČSN EN 14617-16 – Artificial stone – Test methods – Part 16: Determining dimensions, geometrical properties and surface quality of thin slabs
ČSN EN 196-10 –Methods for testing cement – Part 10: Determining water-soluble chromium (Cr6 +) content in cement
Reg. 499/2005 Coll. about the content of natural radionuclides