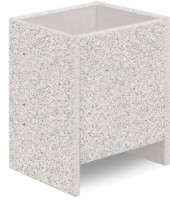
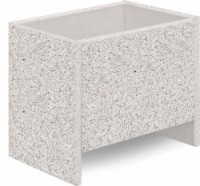
The pots are made, based on an order, from the Granex® XL tiling. The bottom plate has a hole for draining excess water. After the assembly, it is necessary to seal the inner walls of the flowerpot using frost-resistant and water-resistant silicone sealant to prevent water flowing through and dirtying the pot and tiling. Similarly, it is recommended to place under the flowerpot an appropriate dish (tray) to capture the water from the bottom hole.
Flowerpots are available, in addition to EURO pallets, on single-use pallets.
| Flowerpot | Dimensions (L x W x H) in mm | Weight of bigest piece in kg | Overal weight in kg | Design | |
|---|---|---|---|---|---|
| Size1 | 400 x 395 x 600 | 16,3 | 70 | Designs of tiles Granex® XL | |
| Size 2 | 660 x 395 x 500 | 16,5 | 75 | Designs of tiles Granex® XL | |
| Size 3 | 860 x 395 x 500 | 23 | 100 | Designs of tiles Granex® XXL | |
Installation of flower pots
Flowerpot – size 1
The assembly itself is not complicated. At least two people are required to assemble the pot. Prior the actual assembly, spread all the parts and check whether the package is complete and whether the individual components are not damaged. The following are needed for the assembly: a 13-mm wrench and frost-resistant and water-resistant silicone sealant (not supplied).
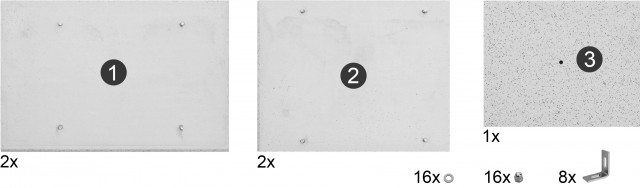
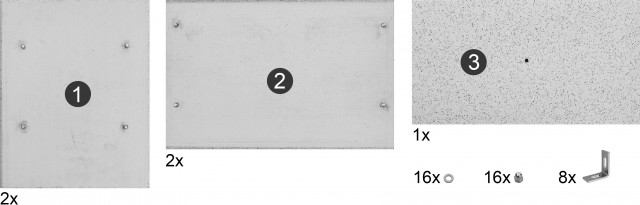
Package contents:
- Supporting outer side wall (part 1) with four screws on the inside and with three rounded edges – 2 pieces
- Inner side wall (part 2) with four screws on the inside and with one rounded edge – 2 pieces
- Bottom with a hole (part 3) – 1 piece
- Connecting profile – 8 pieces
- Nuts – 16 pieces
- Washers – 16 pieces
Actual assembly procedure:
| 1 | 2 | 3 | 4 |
|---|---|---|---|
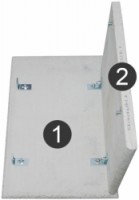 | 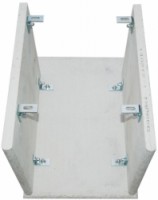 | 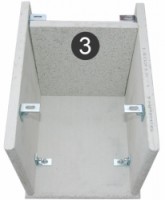 |  |
Na rovnou plochu položte díl 1(vnější boční stěnu) šrouby nahoru. Postupně vezměte 4 ks rohových spojovacích profilů a připevněte je pomocí matic s podložkami k položenému dílu 1(lehce dotáhněte). Place part 1 (outer side wall) on a flat surface, the screws up. Take the 4 pieces of the corner connecting profiles one after one and attach them, using the nuts and washers, to the laid part 1(tighten slightly). Take part 2 (inner side wall), lay it so that its rounded edge faces the rounded upper edge of part 1and the protruding screws fit into two adjacent profiles. Fasten topart 1 with nuts and washers and tighten slightly. Pay attention that the upper rounded edges are flush. | Attach the other piece of part 2 to part 1 using the same procedure Attach the remaining 4 connecting profiles to the two connected parts 2 | Take the other piece of part 1and place it with the screws into the free positions of the profiles attached to parts 2; fit the remaining washers and screw in the nuts.Tighten all the screws (tighten with care); after that, the flowerpot can be put to its final position. Check the alignment of the components and placement of the bottom, or loosen the nuts, align the components as necessary and re-tighten the nuts carefully. When the assembly is complete, seal the inner joints of the flowerpot with frost-resistant and water-resistant silicone sealant (not supplied). | Vezměte druhý kus dílu 1 a usaďte jej šrouby do volných pozic profilů připevněných k dílům 2, nasaďte zbývající podložky a našroubujte matice. Všechny šrouby dotáhněte (dotahujte citlivě), poté můžete květináč postavit do finální polohy. Překontrolujte srovnání jednotlivých dílů a usazení dna, popřípadě povolte matice, srovnejte podle potřeby a poté znovu opatrně dotáhněte. Po složení utěsněte vnitřní spáry květináče pomocí mrazuvzdorného voděodolného silikonového tmelu (není součástí dodávky). |
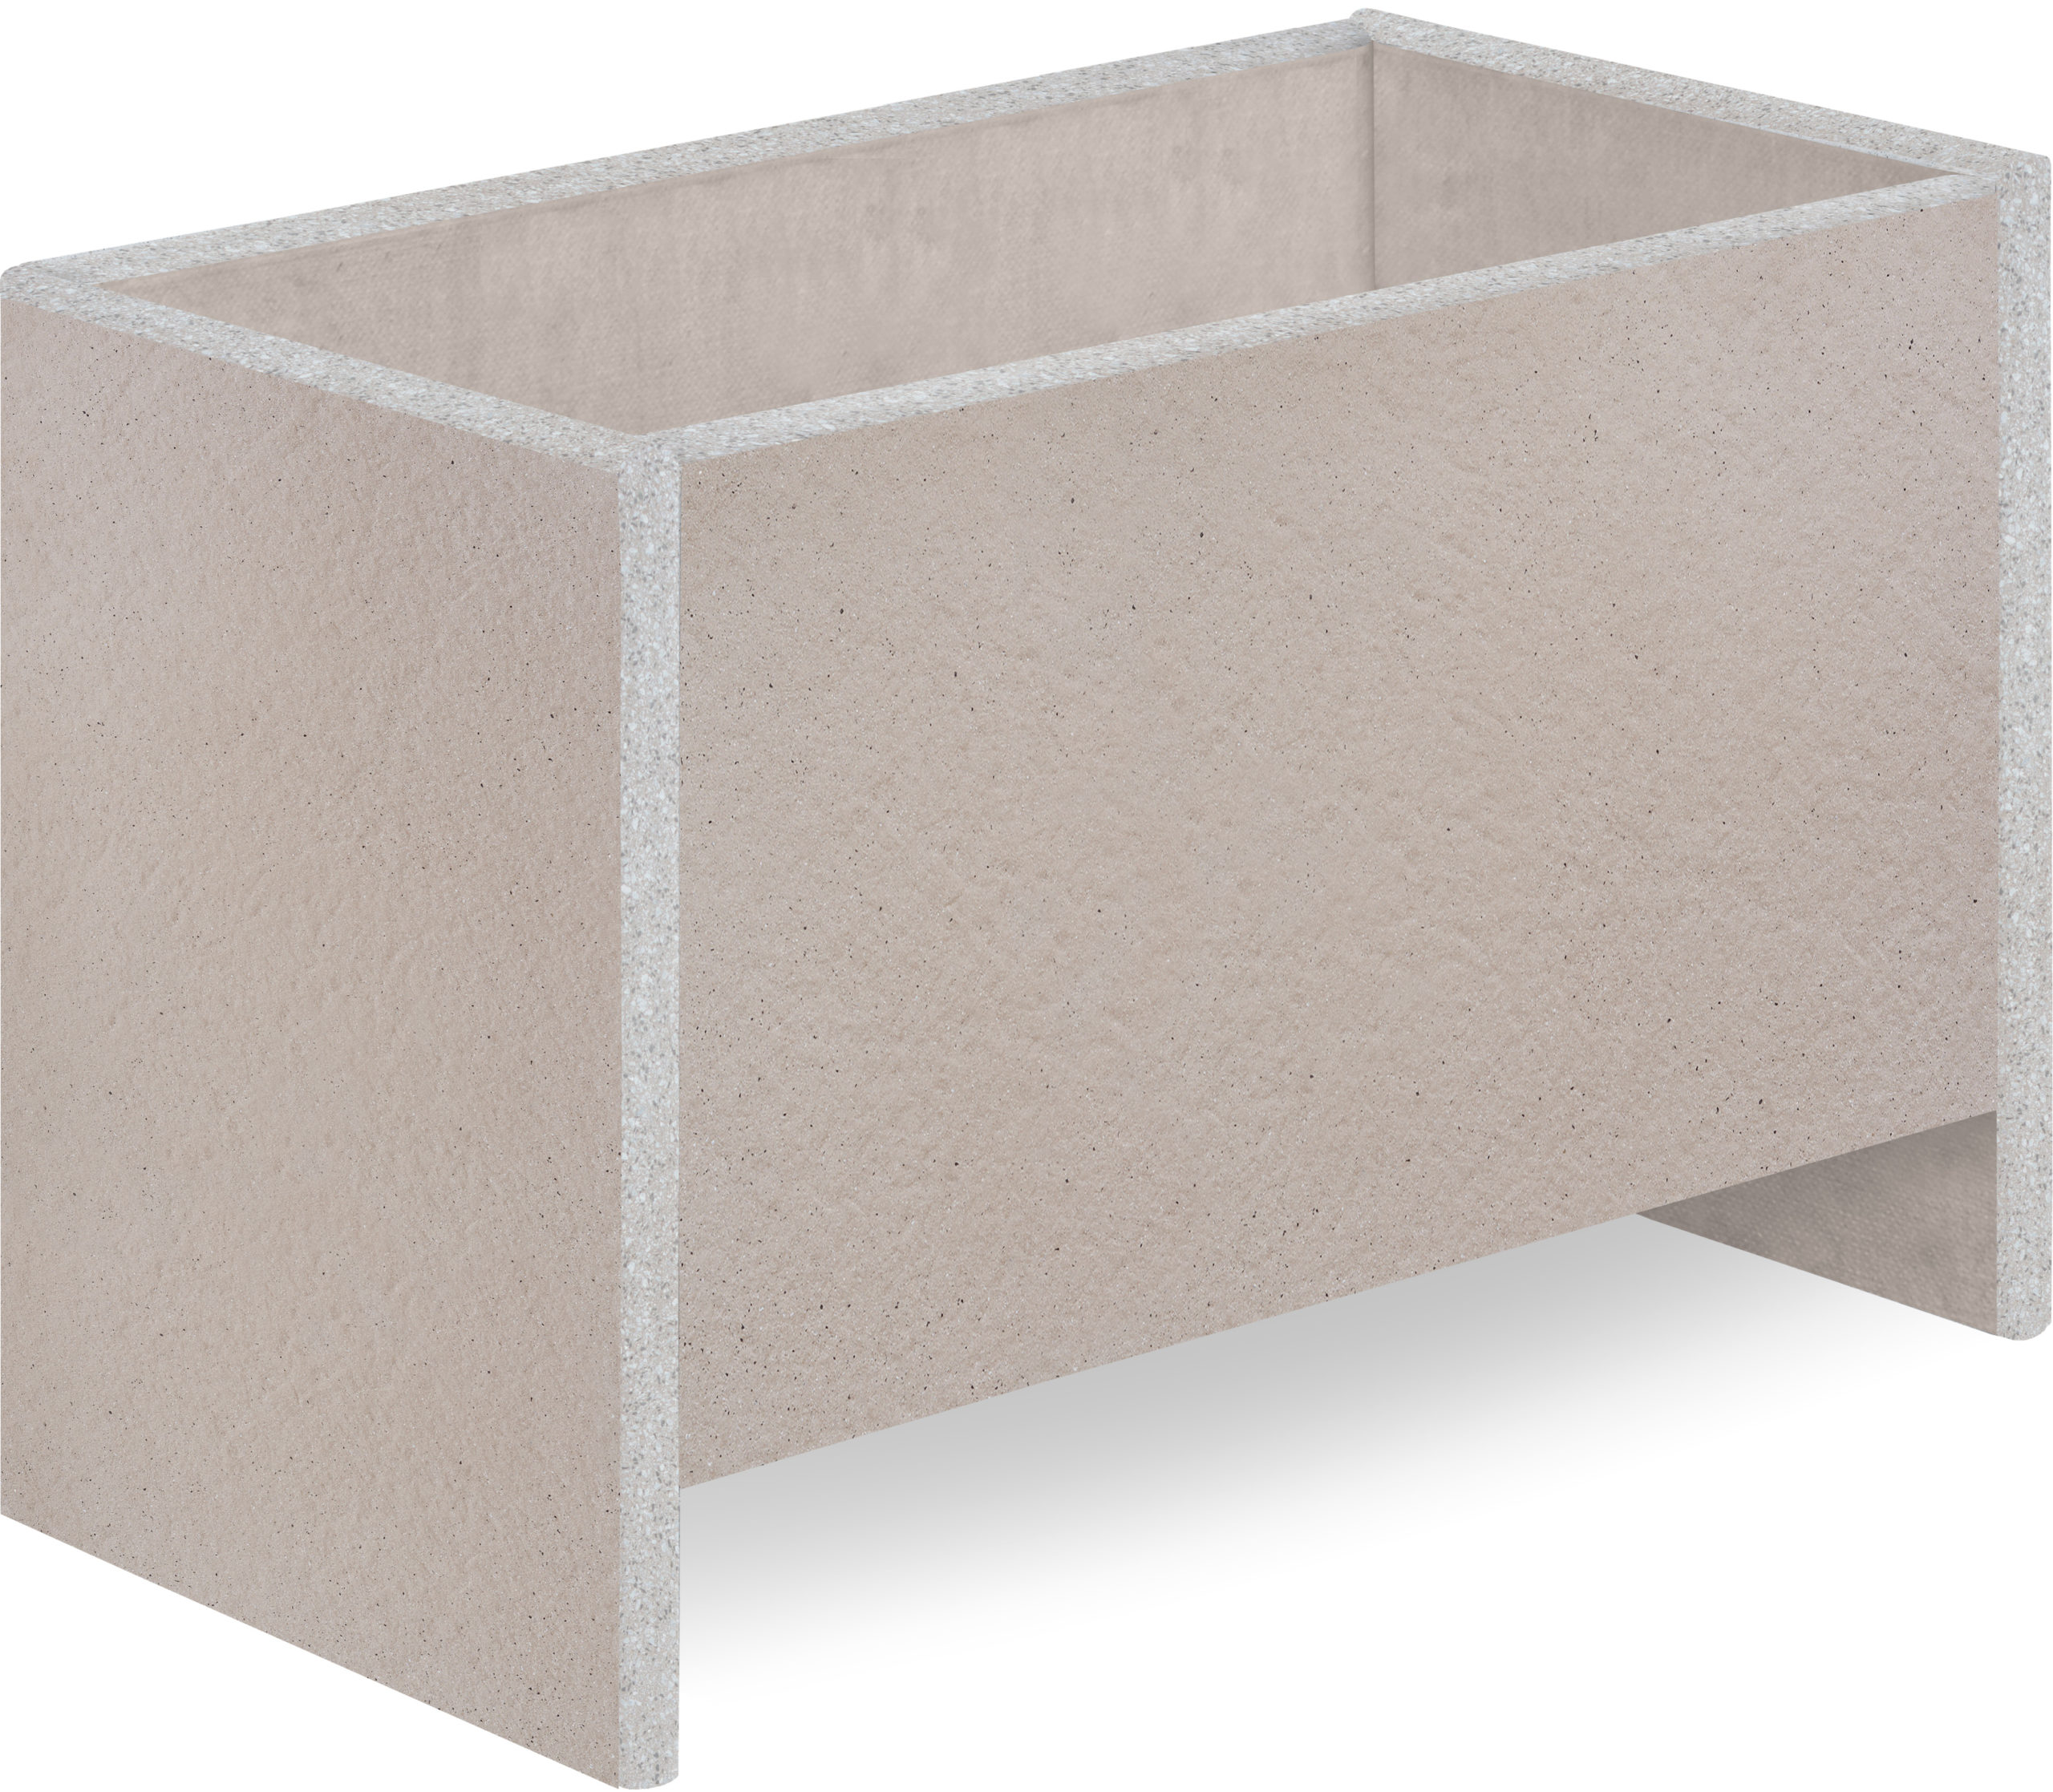
Flowerpot – size 2
The assembly itself is not complicated. At least two people are required to assemble the pot. Prior the actual assembly, spread all the parts and check whether the package is complete and whether the individual components are not damaged. The following are needed for the assembly: a 13-mm wrench and frost-resistant and water-resistant silicone sealant (not supplied).
Package contents:
- Supporting outer side wall (part 1) with four screws on the inside and with three rounded edges – 2 pieces
- Inner side wall (part 2) with four screws on the inside and with one rounded edge – 2 pieces
- Bottom with a hole (part 3) – 1 piece
- Connecting profile – 8 pieces
- Nuts – 16 pieces
- Washers – 16 pieces
Actual assembly procedure:
| 1 | 2 | 3 | 4 |
|---|---|---|---|
| | | |
Na rovnou plochu položte díl 1(vnější boční stěnu) šrouby nahoru. Postupně vezměte 4 ks rohových spojovacích profilů a připevněte je pomocí matic s podložkami k položenému dílu 1(lehce dotáhněte). Place part 1 (outer side wall) on a flat surface, the screws up. Take the 4 pieces of the corner connecting profiles one after one and attach them, using the nuts and washers, to the laid part 1(tighten slightly). Take part 2 (inner side wall), lay it so that its rounded edge faces the rounded upper edge of part 1and the protruding screws fit into two adjacent profiles. Fasten topart 1 with nuts and washers and tighten slightly. Pay attention that the upper rounded edges are flush. | Attach the other piece of part 2 to part 1 using the same procedure Attach the remaining 4 connecting profiles to the two connected parts 2 | Take the other piece of part 1and place it with the screws into the free positions of the profiles attached to parts 2; fit the remaining washers and screw in the nuts.Tighten all the screws (tighten with care); after that, the flowerpot can be put to its final position. Check the alignment of the components and placement of the bottom, or loosen the nuts, align the components as necessary and re-tighten the nuts carefully. When the assembly is complete, seal the inner joints of the flowerpot with frost-resistant and water-resistant silicone sealant (not supplied). | Vezměte druhý kus dílu 1 a usaďte jej šrouby do volných pozic profilů připevněných k dílům 2, nasaďte zbývající podložky a našroubujte matice. Všechny šrouby dotáhněte (dotahujte citlivě), poté můžete květináč postavit do finální polohy. Překontrolujte srovnání jednotlivých dílů a usazení dna, popřípadě povolte matice, srovnejte podle potřeby a poté znovu opatrně dotáhněte. Po složení utěsněte vnitřní spáry květináče pomocí mrazuvzdorného voděodolného silikonového tmelu (není součástí dodávky). |
Flowerpot – size 3
The assembly itself is not complicated. At least two people are required to assemble the pot. Prior the actual assembly, spread all the parts and check whether the package is complete and whether the individual components are not damaged. The following are needed for the assembly: a 13-mm wrench and frost-resistant and water-resistant silicone sealant (not supplied).
Package contents:
- Supporting outer side wall (part 1) with four screws on the inside and with three rounded edges – 2 pieces
- Inner side wall (part 2) with four screws on the inside and with one rounded edge – 2 pieces
- Bottom with a hole (part 3) – 1 piece
- Connecting profile – 8 pieces
- Nuts – 16 pieces
- Washers – 16 pieces
Actual assembly procedure:
| 1 | 2 | 3 | 4 |
|---|---|---|---|
| | | |
Na rovnou plochu položte díl 1(vnější boční stěnu) šrouby nahoru. Postupně vezměte 4 ks rohových spojovacích profilů a připevněte je pomocí matic s podložkami k položenému dílu 1(lehce dotáhněte). Place part 1 (outer side wall) on a flat surface, the screws up. Take the 4 pieces of the corner connecting profiles one after one and attach them, using the nuts and washers, to the laid part 1(tighten slightly). Take part 2 (inner side wall), lay it so that its rounded edge faces the rounded upper edge of part 1and the protruding screws fit into two adjacent profiles. Fasten topart 1 with nuts and washers and tighten slightly. Pay attention that the upper rounded edges are flush. | Attach the other piece of part 2 to part 1 using the same procedure Attach the remaining 4 connecting profiles to the two connected parts 2 | Take the other piece of part 1and place it with the screws into the free positions of the profiles attached to parts 2; fit the remaining washers and screw in the nuts.Tighten all the screws (tighten with care); after that, the flowerpot can be put to its final position. Check the alignment of the components and placement of the bottom, or loosen the nuts, align the components as necessary and re-tighten the nuts carefully. When the assembly is complete, seal the inner joints of the flowerpot with frost-resistant and water-resistant silicone sealant (not supplied). | Vezměte druhý kus dílu 1 a usaďte jej šrouby do volných pozic profilů připevněných k dílům 2, nasaďte zbývající podložky a našroubujte matice. Všechny šrouby dotáhněte (dotahujte citlivě), poté můžete květináč postavit do finální polohy. Překontrolujte srovnání jednotlivých dílů a usazení dna, popřípadě povolte matice, srovnejte podle potřeby a poté znovu opatrně dotáhněte. Po složení utěsněte vnitřní spáry květináče pomocí mrazuvzdorného voděodolného silikonového tmelu (není součástí dodávky). |